
Samba is a free and open-source SMB/CIFS Protocol implementation for Unix and Linux that allows for file and print sharing between Unix/Linux, Windows, and macOS machines in a local area network.
Samba is usually installed and run on Linux. It comprises several programs that serve different but related purposes, the most important two of which are:
sudo apt install samba samba-common-bin
smbd --version
systemctl status smbd nmbd
sudo systemctl start smbd nmbd
Once started, smbd will be listening on TCP port 139 and 445. nmbd will be listening on UDP ports 137 and 138.
If you have enabled the on Ubuntu, then you need to open the above ports in the firewall with the following command.
sudo ufw allow samba
we will see how to create a private Samba share that requires the client to enter a username and password in order to gain access. The main Samba configuration file is located at: /etc/samba/smb.conf. You can edit it in the terminal with a command-line text editor like nano.
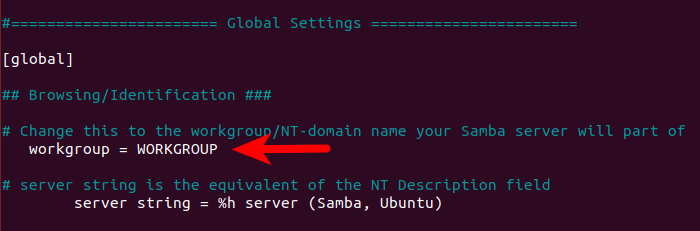
sudo nano /etc/samba/smb.confIn the [global] section, make sure the value is the same as the workgroup settings of Windows computers.
workgroup = WORKGROUP

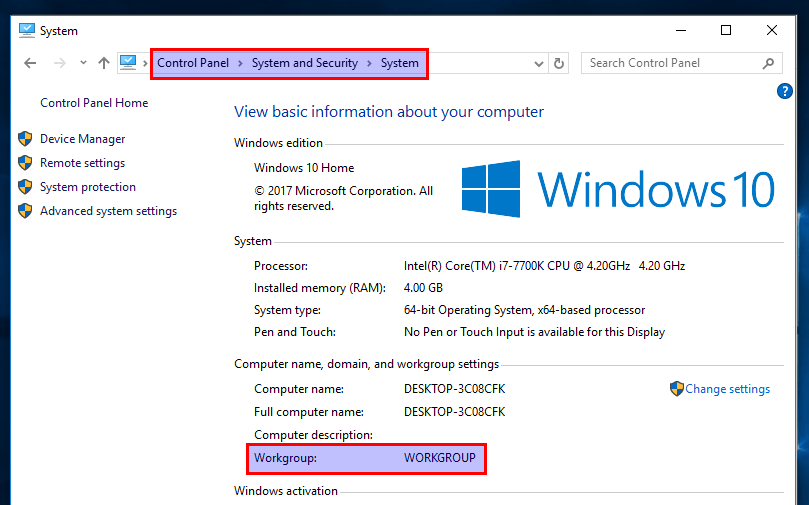
You can find the setting on your Windows computer by going to Control Panel > System and Security > System

Then scroll down to the bottom of the file. (In a nano text editor, you can achieve that by pressing CTRL+W then CTRL+V. ) Add a new section like below.
[Private]

comment = needs username and password to access
path = /srv/samba/private/
browseable = yes
guest ok = no
writable = yes
valid users = @samba
Explanation:
Private is the folder name that will be displayed on the Windows network./srv/samba/private/ as an example. You can also use a folder in your home directory.browseable = yes: Allow other computers in the network to see the Samba server and Samba share. If set to no, users have to know the name of the Samba server and then manually enter a path in the file manager to access the shared folder.guest ok = no: Disable guest access. In other words, you need to enter username and password on the client computer to access the shared folder.writable = yes: Grants both read and write permission to clients.valid users = @samba: Only users in the samba group are allowed to access this Samba share.Save and close the file. (To save the file in a nano text editor, press, then press Enter to confirm the file name to write. To close the file, press Ctrl+X.) Now we need to create a Samba user. First, we need to create a standard Linux user account with the following command. Replace with your desired username.
sudo adduser usernameYou will be prompted to set a Unix password. After that, you also need to set a separate Samba password for the new user with the following command:
sudo smbpasswd -a username
Create the samba group.
sudo groupadd samba
And add this user to the samba group.
sudo gpasswd -a username samba
Create the private share folder.
sudo mkdir -p /srv/samba/private/
The samba group needs to have read, write and execute permission on the shared folder. You can grant these permissions by executing the following command. (If your system doesn’t have the setfacl command, you need to install the acl package with sudo apt install acl.)
sudo setfacl -R -m "g:samba:rwx" /srv/samba/private/
Next, run the following command to check if there are syntactic errors.
testparmNow all left to do is to restart smbd and nmbd daemon.
sudo systemctl restart smbd nmbd
o create a public share without requiring a username and password, the following conditions must be met.
security = user in the global section of Samba configuration file. Although you can create a public share with the security = share mode, but this security mode is deprecated. It is strongly suggested that you avoid share mode.map to guest = bad user in the global section of Samba configuration file. This will cause smbd to use a guest account to authenticate clients who don’t have registered account on the Samba server. Since it’s a guest account, Samba clients don’t need to enter password.guest ok = yes in the share definition to allow guest access.nobody account, which is the default guest account.As a matter of fact, the first two conditions are already met as Samba by default uses these two settings.
Here’s a step-by-step guide to creating a public share. First, open and edit the Samba configuration file.
sudo nano /etc/samba/smb.conf
n the [global] section, make sure the value of workgroup is the same with the workgroup settings of Windows computers.
workgroup = WORKGROUP
You can find the setting on your Windows computer by going to Control Panel > System and Security > System.
Then scroll down to the bottom of the file and paste the following lines.
[public]

comment = public share, no need to enter username and password
path = /srv/samba/public/
browseable = yes
writable = yes
guest ok = yes
Save and close the file. Next, create the /srv/samba/public/ folder.
sudo mkdir -p /srv/samba/public
Then make sure the nobody account has read, write and execute permission on the public folder by executing the following command. (If your system doesn’t have the setfacl command, you need to install the acl package with sudo apt install acl.)
sudo setfacl -R -m "u:nobody:rwx" /srv/samba/public/Restart smbd and nmbd.
sudo systemctl restart smbd nmbd
On a Windows computer that is in the same network, open File Explorer and click Network on the left pane. If you see the following message, then you need to click on the message and turn on network discovery and file sharing.
File sharing is turned off. Some network computers and devices might not be visible.
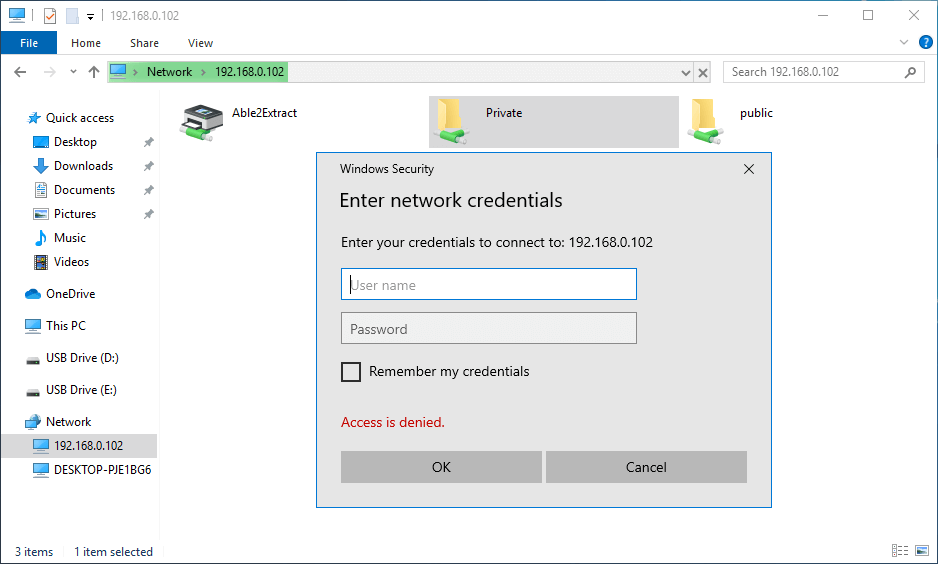
Next, enter \\ followed by the IP address of Samba server in the address bar of File Explorer, like this: \\192.168.0.102. You will see a list of shared resources on the Samba server.
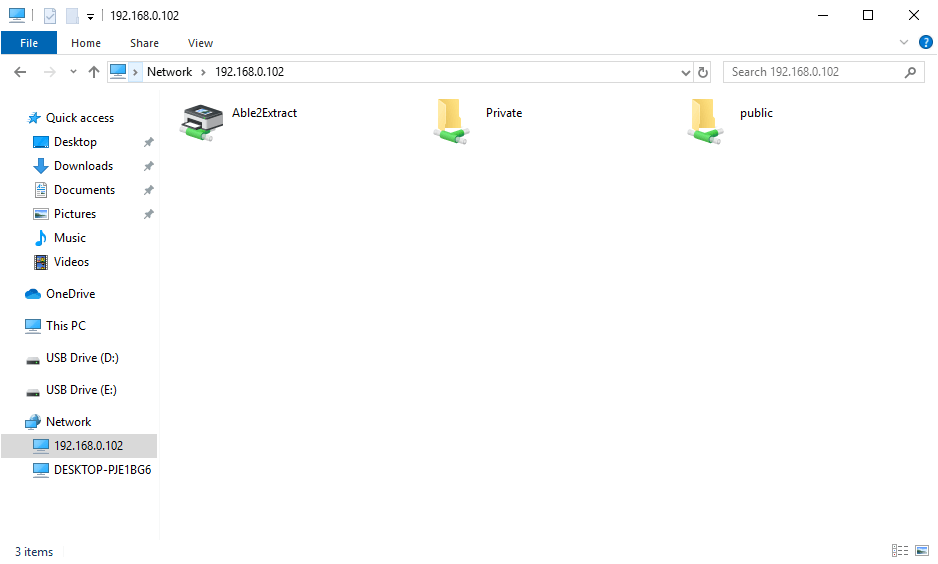
Then double-click the shared folder. To access the private share, you need to enter the samba username and password. You don’t need to do so to access the public share.
Once connected, you can read, write and delete files in the Samba shared folder.


Leave A Comment